Pages

Sunday, February 18, 2018

Our Estimation Station


Want a simple class routine that boosts students' estimation skills?  Try an "Estimation Station."

I have this area set up in the window sill.  It doesn't take much room or even much preparation, but it provides some much needed math practice.

I purchased the estimation container at a teacher supply store.  You could use anything that has a secure lid and is transparent.  A cleaned out mayonnaise jar would work fine. Next, fill the jar with some small seasonal items.  Be sure you have counted them and written the exact count somewhere. I usually write it on a post-it, fold it,  and tape it to the inside of the lid so that the kids can't see it.

At the end of the month, we take a few minutes and have everyone write down their estimates.  The person who comes the closest without going over gets to pick something out of the prize box.

A good chapter book to read to the class before starting this routine is The Candy Corn Contest by Patricia Reilly Giff.  I usually read this book in late September or early October before we start this routine.  As you can see in the picture, I also have a few books about estimation propped up nearby.

Some of the things I have used in the jar: erasers, fake leaves, acorns, little Christmas baubles, candy kisses, gold coins, cotton balls (as snowballs), jelly beans, plastic hearts from Hobby Lobby, and toy cars.  Thinking up things to put in the jar is my favorite part!

Here is a freebie you can print and use with your "Estimation Station."


Do you have any class routines to help with math skills?  Please share!

Saturday, February 10, 2018

Writing Brag Tag Freebie!


Do your students love collecting brag tags?  Mine do!  I love the fact that I can use these inexpensive and readily available  resources to inspire and reward my kids.  Last week I shared how I use an "Author of the Week" routine to share student work as writing mentors.  I recently created these brag tags as another way to shine the spotlight on great student writing.

Grab your freebie here.

I hope you can use them too!  Thanks for stopping by!


Wednesday, February 7, 2018

Celebrate the Student Author of the Week

Student writing mentors are great!

Want a great way to motivate your writers?  Try having a student "Author of the Week." This little addition to our classroom routine is having quite a positive impact on the students.

Each week, while conferring with the students, I look for one piece to highlight in the classroom.  I try to find a specific "craft move" or practice that I can share from the piece.  In this way, the student writer becomes a mentor for others.

Whoever is chosen as the "Author of the Week" not only gets to have their piece hung up in the classroom for the week (I make a copy so the student still has the original), but they also win some fabulous prizes.

The author of the week gets a blank book (usually one from the Target dollar section) to use in any way they choose.  They also get a brag tag that says "Awesome Author."

Here are a few pics from some of my colleagues that also do a similar thing.

Another fabulous writer...

This teacher actually has a spotlight shining on the poster!

This teacher makes color copies to show.


Thanks for visiting!  Please share your thoughts and ideas with me!  Do you have student mentors in your class?  How do you showcase student writing?

Sunday, January 28, 2018

New Year, New Decor!


I know... It's not exactly the "New Year" for school or the calendar, but I'm a little behind in posts.  ðŸ˜¯

This past summer I stumbled upon a wine rack at the thrift store. (Maybe I shouldn't have said "stumbled.") Since I can't have wine in my classroom, I thought I would have the next best thing- COFFEE!  The picture on the right shows the wine rack after I removed the slats that held bottles of wine.  I thought it would make a cute coffee bar for my classroom.

I searched Pinterest for some ideas and inspiration.  I decided I liked the color combination of red and teal.  One of the biggest reasons I used the color combo is because I already had lots of red stuff in my classroom.  I had acquired a primary colored classroom theme by default.  I hadn't planned on changing anything, it just happened that I was inspired.

I had a blast looking for little things to add to my decor at Hobby Lobby, Big Lots, Target, and of course the thrift stores.  I had decided that I really wanted to make my classroom look and feel more "homelike."   We spend SO much of our day in this room, it should be appealing and comfy.


I found some cute wire picture holders on clearance.  The sales lady even reduced the price further because of a missing clip and a small ding on one of them.  I only paid about $15 for the pair.  I sent a letter home to my classroom families asking them to send in family pictures.  I posted them on the clips above the coffee bar.  I also have a cute framed poem about families propped up on the refrigerator.

I bought wire farmhouse baskets to insert in the coffee bar piece.  I keep snacks and other kitchen things like paper plates, napkins, and plastic silverware in the baskets.  I added a red chevron burlap bow to the bottom basket.

I bought the mugs at the thrift store and hung them on a rack.  My son added the lettering that says "The Classy Cafe." (My principal thought of that title.)  I bought the little wire 2 tiered holder at Hobby Lobby.  It's filled with napkins and K-Cups of coffee and tea.  I love when my friends come in to visit and grab a cup!

The little cafe table was something I had in my backyard.  One chair is broken so I only have one.  It was originally black wrought iron, but I spray painted it red.  I think it turned out cute!  I just threw a piece of blue polka dotted cloth on the top.


I recovered my 2 file cabinets with chevron paper in red, teal, and yellow.  I found the yellow curtain that is covering a large book shelf at the thrift store. I liked the little pop of yellow with the red and teal.  I used yellow knobs on my drawers of the coffee bar and desk.

Here's a picture of my desk area:


I painted the desk ($25 from the thrift store).  A friend gave me the little red polka dotted curtain to hang under the sitting area.  I just use the desk as a storage area so I stick things under it.  I found a bulletin board that I covered in red polka dotted fabric too. Then I added some accents of burlap ribbon for border.  The blue flowers came from The Dollar Tree.

My husband made the book shelf that is hanging above my desk.  I wanted an area where I could put some of my professional books.  Most of those books I keep at home.  I have a collection of books that is, according to my mother, just sinful.

I bought the wire 3 tiered hanging file at T.J.Maxx  (not sure if that is how you spell it).  I decorated a small lamp shade and added an accent lamp near my desk.

I wanted to make new book labels for my book bins and try to reorganize a bit.  I got a tall wire spinning book rack from a friend whose store was going out of business.  I found the toy chest bench at the thrift store too.  The accent pillows are made from bandanas.


The chair I had in my reading area was falling apart.  I found this red chair at a home store consignment shop.  I bought a yellow pillow at Target for an accent.


The wire 3 tiered book rack on the left is red.  It doesn't show up well in the picture.  I bought it at Hobby Lobby. The other small wire rack on rollers came from the thrift store.  I painted it and added a ribbon.  I kept the same rug that I already had.

Like I said, it was a blast redecorating this summer!  Here are a couple of other pics that show where we keep our i-pads and classroom supplies.


Thanks for stopping by!  Do you have a classroom theme or color scheme to share?


Saturday, July 15, 2017

How to Use Inquiry Based Group Research Projects- Step 5

This is the 5th and final post in a series about how to use inquiry based group research projects.  Don't forget your freebie at the end of this post!

We are ready for the last step:

5. Share.


In the last post, I explained how to take the individual sections and combine into one finished group product.  Before beginning the project, you thought about your audience.  Now is the time to share and shine!  Your students will be so excited to share these projects.  Consider setting up a display in the hallway or other common area so that more people can view the projects.

You may also want to have feedback forms available for the audience to respond.  My students were excited to take their finished reports to younger grade levels to share.  We visited a few first grade classes and read our finished reports.

If you have stuck with me through all of these posts, THANK YOU!  Here's a freebie to do your own inquiry based animal reports.  I hope you find it useful.


Please let me know your thoughts, feedback, or ideas on the inquiry based approach.  I would LOVE to hear from you!

Thursday, July 13, 2017

How to Use Inquiry Based Group Research Projects- Step 4

This is the 4th in a series of posts on using inquiry based research projects.  We are ready for the next step:

4. Polish and Publish.
Rubric for the Animal Project
Now that students have completed their section of the project, they will need to double check it for errors and fix anything that stands out.  They can do this on their own or with a partner.  Although my students used a rubric to help them check their work throughout the project, it was a good time to let the group reflect together.

Remind students to think about the audience.  I often tell the writers to look at their project through the eyes of the readers.  It can be difficult for students, especially young students, to edit their work independently.  Providing support through groups and partnerships helps ease this challenge.

Collect the finished papers from each person and sort them into groups according to topic.  In my class, I had 4 groups total (sharks, wolves, snakes, and frogs).  I put the papers in the same order for each group: Appearance, Habitat, Predators and Prey, and Interesting Facts.  Now I had a "book" that could be copied for each person in the group.  If there were 6 people in the wolf group, I made 7 copies of the book.  One for each person to keep and one for the class library.

Because we know that non-fiction books have certain text features that help the reader locate information and understand the text, you may want to have your students add these features to their books.  In my class, we added a table of contents, a glossary page, and an index. We added a laminated cover to each book too. ( The next post includes a freebie with these forms!)

Once you have the projects "published", you will want to share.  I'll talk about that in the next post.

Thanks for sticking with me!


Wednesday, July 12, 2017

How to Use Inquiry Based Group Research Projects- Step 3

This post is the 3rd in a series of posts on how to use inquiry based group research projects.  The previous post covered asking and answering questions.  In this post, we will:

3. Summarize, synthesize, and write.


The next step in the process requires students to work together. At this point in the project, students should have the answers to most of their questions on their post-its.  They may even have additional information they think is important to include.  Although students have been working independently to read and gather information, it is now time for each group to work collaboratively.  Prior to releasing them to their groups, you will want to model the expectations.

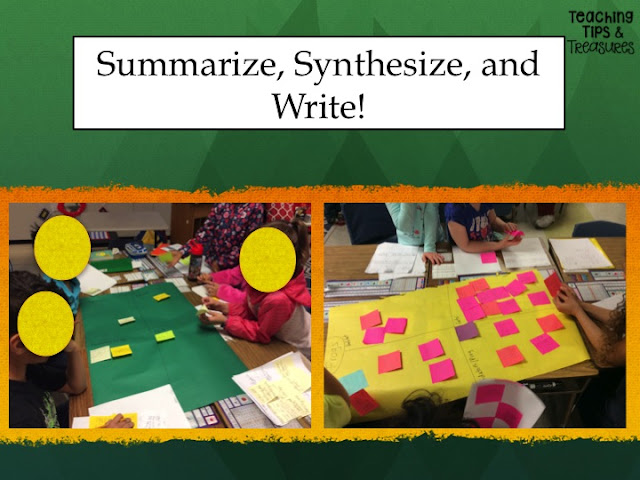
For this part, you will need your post-it notes on the topic you are modeling.  As my students are researching animals, I chose to model using turtles as my focus. I also had a large poster sized paper on display.  I gathered the students together as a class and showed how I could group my notes into categories.  I did a "think aloud" as I read some of the post-its and noticed ways they were alike.  I discovered that I could group my post-its into the following categories: Appearance, Habitat, Predators and Prey, and Interesting Facts.

I took a large poster sized paper and divided it into these categories.  Next, I read each post-it and decided where it fit on the poster. After modeling my thinking, I sent the students back into their animal groups to do the same.  Again, everyone was accountable because each person had several post-it notes to categorize.

The great thing about this part of the activity is that the students really have to talk and work together to decide where certain notes will be placed. Also, if there are 2 notes that say the same thing, they have to decide which one to eliminate.  Students will develop their negotiation and compromising skills during this step. Depending on how frequently your students have worked together in the past, you may need to do a mini-lesson on how to respectfully and politely discuss ideas.  This part of the project can be difficult for some students.  You will want to teach those students how to compromise.

One interesting thing that happened with one of my groups was that 2 students found conflicting information in different texts.  One source stated a certain speed that a wolf could run while another book gave a different number.  This led to a great discussion on why they thought that happened. They also talked about how to decide which fact to include.  As the facilitator of this lesson, I just prompted by asking questions.  I left the decision making up to the group.

Once all of the notes are sorted, it's time to assign individual roles to the group project.  Each person in the group will become accountable for one category.  In some cases you may have 2-3 students assigned to one category.  In a six person group, I  assigned 1 person to Appearance, 1 to Habitat, 2 to Predators and Prey, and 2 to Facts.  Again, although this is a group project, there is individual accountability.

Remember that all of the group's notes have been sorted and categorized on a large poster.  Each group's poster will need to be cut apart so that individuals can work on their section of the project.
The person (or people) will be responsible for taking all of the notes for their category and synthesizing the information.  They will need to write a paragraph or page (depending on the amount of information gathered) that will be shared with all of the members of their group.  The need for neat writing and use of conventions becomes critical here.  Students have to write legibly and coherently because their team is depending on them!  (more on that in the next post)

This is another step that needs to be explicitly modeled.  Using my own information about turtles, I showed the students how I thought of a question to guide me for each category.  For example, when looking at the "Appearance" section, I needed to answer, "What does a turtle look like?"  Keeping the question in mind will help the students stay focused on writing about their topic which is the next step.

This is where another shift in the project will occur.  You will want to meet with all of the students who are responsible for the same category as one group. For example, there was one person from the shark groups, one from the wolf group, etc. who was assigned to work on "Appearance."  By working with small groups you can provide support and modeling when needed.  I usually met with these small groups during our Daily 5 time.  Think about what mini-lessons these groups will need.  How will you model synthesizing the information?  You may decide to model these lessons to the whole class as one group, or you may differentiate the lessons based on what each small group needs.

So, let's look at what has happened so far.  We started with a broad topic: animals.  Students were then assigned one animal to research.  This created 4 smaller groups.  Each person in the group had to think of questions and gather information related to their animal.  These questions and answers were pulled together on a large poster sized chart and grouped into the following categories: Appearance, Habitat, Predators and Prey, and Interesting Facts.  Students were then assigned one category from the poster.  Next students used all of the notes gathered by their group to work on one section of the project.  The next step will bring the individuals back to the group.

In the next post, I will explain how to bring the pieces together and polish and publish the project.

Thanks for stopping by!